Summary of drawing classes favorite fairy tale. Tamara Komarova - Classes in fine arts in the kindergarten preparatory group for school. Abstracts of classes. Synopsis of GCD "My favorite fairy tale
Elena Halangot
Synopsis of GCD “My favorite fairy tale»
Target:
To consolidate children's knowledge of previously read works, to continue to teach them to emotionally perceive the content, to present
images of characters, express their impressions in words, facial expressions, gestures; enrich speech fabulous vocabulary; to form the intonational expressiveness of children's speech; bring up aesthetic attitude to the works folk art; to form fine skills and skills of working with a brush and pencil (depicting fairy tale characters, to convey characteristic features).
Once upon a time the Internet needs to be added to this list! Our favorite fairy tale characters got a laptop and learned an important lesson about online safety. Eventually a very large bill arrives and all the characters discover some problems with going online without permission. Discussing and discovering the elements of a fairy tale is an effective strategy for understanding these stories. Fairy tales are different from any other genre because of their magical elements and characteristics.
Before reading this book, it is important to build up a basic knowledge of the elements of the tale as well as the characters that will appear in this story so that students can really enjoy this text. Jack of Jack and the Beanstalk, Giant, Cinderella, Fairy Goddess Cinderella, Little Red Riding Hood, Rapunzel, Three Little Pigs and Big Bad Wolf, all pretend! Throw a little judging practice into the mix. already familiar with the titles associated with Once Upon a Time on the Web characters. I always enjoy reading original fairy tale stories to my students, whether they are familiar or not, so we can use the oral tradition together and discuss the valuable lessons that are presented.
preliminary work:
Reading Russian folk fairy tales, viewing
illustrations.
Drawing on themes: "Hut - winter hut", "Apple tree with apples"(from
fairy tales"Swan geese", "Apron for Grandma",
"The testicles are simple and golden", "Snow Maiden".
Sculpting on themes: "Carrots for Bunnies", "Bowls for three bears", "The testicles are simple and golden".
Hover over the image until you see three dots in the top right corner. You might consider making several different boards and split your students into small groups. Otherwise, keep one board for everyone to work with. If you are limited by the number of devices you have available, just ask on the board and invite students one at a time to add their ideas. A big message is being typed for the students. The post-it will resize to a smaller rectangle and students can place it in the correct category.
View fairy tales on filmstrips.
M a t e r i a l k z a
1. Book « Fairy tales» with illustrations.
2. Classical music cassettes.
3. Box with items from friends fairy tales.
4. Sheets of paper, gouache, pencils, napkins, jars of water, brushes.
5. Costumes for children and presenter (characters fairy tales) .
They can even add images to their notes! In the example below, you'll see that I first had students create a sticky note with their name lined up on the right. 
Once all thoughts have been added, discuss each character with the class.
Don't assign any tasks, just read. Your students will still be able to pick out the following fairy tale elements from this story. After reading, take a picture, starting at the beginning, and discuss the emerging elements of the tale. We will check each element that we have found when we read different fairy tales. It would be great if you could create understanding help for your fabulous group.
H o d z a n i t and i.
Classical music sounds, children sit on high chairs
semicircle.
caregiver: Children, today we are going on an unusual journey. We will find ourselves where animals can talk, objects can move on their own, where miracles happen and goodness and justice always win, and laziness and greed are punished. Have you guessed where we're going?
Looks like that. Do you know why it once kept the giraffe speechless? Is the elephant carrying a chest? And how did it happen that the cat became a pet? With colorful and poetic language, stories collected from different countries, tell about the creation and strength of nature, about the victory of cunning over even the most powerful adversary, and about the time of harmony between man and beast. Together with imaginative illustrations by South African artists, this extremely lovingly crafted fairytale treasure takes you on a fascinating journey across the black continent through Africa, full of wisdom, wit and courage, from which we can still learn a lot.
Children's answers.
caregiver: Right in fairy tale! And for everything to be fabulous I turn into storyteller and I will turn the kids into heroes fairy tales. (Pronounced magic a saying and the attributes of fairy-tale characters are given).
Behind the step there will be a ladder,
Word by word, put it neatly - there will be a song,
Nelson Mandela's favorite tales, which he collected from various African countries, provide insight into the exotic, often mythical world. The stories tell of the flying rabbit Mmutl, the hunter Mtiyan, who turns into a snake with seven heads and a seductive magic song of a magnificent bird that only children can resist.
Some of the stories are creation myths that tell how the moon came into being, why animals got horns and tails, and why the cat became a tame pet. This richly illustrated fairy tale treasure appeals to both old and young readers and invites them on an exciting journey across the African continent.
And a ring for a ring - it will become a knitting ...
Sit on the porch with me, listen fairy tale.
And now it's time to fabulous characters to get to know, find out and guess what they are from fairy tales.
A girl dressed as Little Red Riding Hood and a boy, the Gray Wolf, come out.
Wolf: Hello, Little Red Riding Hood!
K. Sh.: Hello, Mr. Gray Wolf.
Like Mahatma Gandhi, Aung San Suu Kyi or Martin Luther King, he is considered a prominent figure in the fight for freedom from racial segregation, oppression and social injustice. Mandela was a major pioneer of a conciliatory transition from apartheid to an egalitarian democratic state in South Africa.
Already during his lifetime, he became a political and moral role model for many people around the world. "We don't really mean, we don't really think that what we're about to say is right." With these words, the Ashanti tales begin to tell their stories, and perhaps they are also suitable as an introduction to a true anthology, since most of these stories have undergone numerous changes over the centuries. They were decorated and enlarged, and sometimes they passed from one people or ethnic group to another.
Wolf: Where are you going, Little Red Riding Hood?
K. Sh.: I'm going to my grandmother. I bring her a pie and a pot of butter.
storyteller: What is this such a fairy tale in which the Wolf met a girl in the forest and what happened next?
Children's answers: This fairy tale by Charles Perrault"Red Riding Hood".
Fox comes out.
storyteller: Children, and in what a fairy tale has this fairy-tale character?
A story is a story and can therefore be told according to one's own imagination, one's own nature or environment; and if the story gets wings and becomes the property of others, then you shouldn't stop them either. One day she returns to her place, enriched with new details and a new voice.
The collection contains some of the most loved stories, treasures that exude Africa's pristine aura, but in many cases also have universal implications, namely where they speak of people, animals and mysticism. The reader will rediscover many popular motifs from African stories, or perhaps even encounter them for the first time.
Children's answers: Are remembered fairy tales: "Kolobok", "Teremok", "Fox with a rock", "Cat, Rooster and Fox".
storyteller: And what song did the Fox sing to lure the Rooster?
Children: together with the Fox they sing a song
"Cockerel, cockerel golden comb ..."
storyteller: And how the Fox deceived everyone in fairy tale"Fox with a rock"
For example, a smart creature who manages to outwit someone is even much larger and stronger than opponents: Hlakanyan with Zulu and Khos or Sankhambi with Venda; a hare, a treacherous little rascal; the cunning jackal, who usually comes in the form of a trickster; hyena as the eternal loser; the lion as a ruler who treats animals with gifts; a snake that inspires fear, but at the same time is also a symbol healing power, often in connection with the power of water; magic spell that can bring disaster or freedom; People and animals that take different forms; terrible cannibals that scare both adults and children.
How the fairy tale is over?
Children's answers.
storyteller: Here I see a bear. one more, one more. How many bears are here? what are they from fairy tales?And who else was in this fairy tale?
In what other fairy tale was the girl Mashenka? How did you, Mashenka, deceive the bear?
Children's answers. Are called fairy tales"Three Bears", "Masha and the Bear".
The collection also contains some new stories from different parts South Africa and the rest of the continent that complement these ancient treasures. May the voice of the storyteller in Africa never cease; May all the children of Africa experience the wonder of books and never lose the ability to enrich their lives on this earth with the magic of fairy tales.
"The bewitching song of a magical bird." This East African tale of the innocence and strength of children was recorded early in the century in Benalanda, Tanganyika by Pastor Julius Olke of the Berlin Church Mission. One day a strange bird entered a small village nestled in the hills. From that moment on, nothing was safe. All the inhabitants planted in the fields disappeared overnight.
storyteller: Well done, children! Everything fairy tales know. Do you know Russian folk games?
Let's play a dance game "Vanya walks" let's rest a bit.
A game "Vanya walks" (physical education minute).
storyteller: And now I want to make riddles for you, but not simple ones, but fabulous. I have a magic box, and there are objects in it. I will get the item, yes about it tell, and you will guess from which fairy tales this item.
Every morning there were fewer sheep, goats and chickens. Even during the daytime, when people were working in the country, a giant bird would come, open its warehouses and granaries, and steal its winter gear. The villagers were devastated. Everywhere there was a need - everywhere wept and gnashed teeth. No one, not even the bravest hero of the village, could catch the bird.
He was too fast for humans. As soon as they saw him, they only heard the sound of his mighty wings as he sat in the crown of an ancient stone among the dense foliage. The head of the village tore out her hair in desperation. One day, after the bird had plundered his livestock and winter supplies, he ordered the elders to sharpen their axes and machetes and continue the fight with the bird. "Throw a tree - that's the only thing that helps," he said.
In the box are: mirror, spoon, doll-inch.
Children guess fairy tales: "Zhiharka", "Snow White and the Seven Dwarfs" or Pushkin's fairy tale"About the dead princess and seven heroes", "Thumbelina".
storyteller: Well, now, children, I want you to give me your favorite fairy tales. Please draw me your favorite fairy tale character, some moment fairy tales, you can mold it from plasticine.
Armed with carefully crafted axes and bush knives, the elderly approached the tree. The first blows were powerful and hit the trunk deep in the marrow. The tree trembled, and a strange, mysterious bird appeared from the dense foliage of its crown. A honey-sweet song escaped his throat. He penetrated the hearts of people and spoke about fabulous, distant things that will never return. Such a deception was the sound that the men, one by one, dropped their axes and machetes.
They knelt down and stared thoughtfully at the bird that sang to them in all its colorful splendor. The hands of the men became weak. Many of the stories in this beautifully designed collection remind us of very familiar European folk tales and fables, such as those collected by the Brothers Grimm. Some of them are creation myths.
Creative activities of children at prepared tables. After the work is finished and left to dry, the children take the chairs and sit down again. The storyteller in a semicircle.
storyteller: What wonderful drawings you have! I'll collect them all and make an album fairy tales. I will look at it and remember you. And now I want to treat you, but you have to guess what. It is too fairy tale character. BUT this story starts like this: “At the edge of the forest, in a warm hut, lived, there were three brother: winged sparrow, hairy mouse,
African tales also tell stories of evil animals, wizards and prince figures, and draw us into the fascinating world of magic and oral belief in higher power and beings that can either harm a person or free him from embarrassment. Many of the elements are based on the universals of the fairy tale world as they take place in different cultures.
Although many of the stories contain moral messages, they are largely freed from the hidden attraction to obedience and virtue ever held up, as this is a European late Enlightenment. Numerous colorful illustrations especially help children to read and provide additional insight into the breathtaking world of thought and experience. different cultures African continent.
Children's answers.
storyteller: That's right, buttery pancake! What the hell was he doing there?
Children's answers: Shchi and porridge cooked.
storyteller: Here's a treat for you guys straight out of fairy tales. Our journey is over, it's over, and who knows fairy tales Yes, he answers well - well done!
| Lesson topic "My Favorite Fairy Tale" Class 5 For elementary school children, reading should be accompanied by adults, in our opinion, since fairy tales may require random explanations. For older children, teens and adults, this book with her stories is a pleasure to read. special kind and the first interesting study of African cultures. Clue book: "My Favorite African Stories"The miracle of the illustrated album. "The best teachers are the ones that show you where to look, but they don't tell you what to look for." This famous saying leaves a bitter taste in the mouth not only for those who have been teaching it for years, but also for those who will eventually become a good teacher. This statement leaves a bitter taste even for the inconsistency present in it: "who cannot do it, teaches", as if the teaching was not a "doing", a specific operation, action and best case, create something new. |
| Lesson type
: combined. That's right folks, it's a book. The book is ours true friend. Very good if you like to be friends with a book. Look at these two books, which book did you really want to consider, read? Why are you interested in this book? Today in the lesson you will try yourself in the role of illustrators. We will create illustrations for your favorite fairy tale. Let's see and guess the heroes for fairy tales.(presentation).
One of the famous artists is Viktor Mikhailovich Vasnetsov. Viktor Mikhailovich Vasnetsov created paintings for many famous fairy tales. Here are just a few of them. Physical education: (
About a fairy-tale hero.) It's time to start building an illustration of your favorite fairy tale, cartoon.
VI. Summary of the lesson. Analysis and evaluation of student work
. |
Lesson Development visual arts
on the topic "Drawing the Interior of a Room" for grade 6
2 lessons (building and finishing in color)

The purpose of the teacher's activity:
To give an idea of compositional techniques and the application of the method of linear-constructive drawing when depicting the interior of a room, the position of each object in space;
The development of spatial thinking in students, compliance with the sequence of the graphic image;
Consolidate the experience gained from knowledge.
Lesson type : combined.
Frontal method of work.
The task : Draw the interior of the room in frontal perspective from the view. (Or - Compose the interior of the room in frontal perspective)
Problem being solved :
How to draw the interior of a room in frontal perspective?
Requirements for the level of preparation of students (result):
Know concepts Key words: horizon line, vanishing point, laws of perspective, composition, visual arts, interior.
Be able to :
Explain the purpose of the room, interior design room in the artist's painting;
Perform an image of the interior of the room according to the presentation using the laws of linear perspective;
Analyze and determine the original constructive forms in the surrounding objects;
Create a graphic image of the interior of the room;
Use different shading to convey the volume, shape of the depicted objects by means of chiaroscuro.
Planned results.
Subject Results:
Formation of the need for artistic creativity;
Mastering elementary practical skills in drawing.
Personal results:
Development of imagination, figurative thinking, spatial representations;
The presence of motivation for creative work, work for the result.
Cognitive educational universal actions:
General educational UUD:
Independent formation of a cognitive goal;
Structuring knowledge;
Conscious and arbitrary construction of a speech statement in oral form;
Monitoring and evaluation of the process and results of activities;
Statement and formation of a problem, independent creation of activity algorithms in solving a task.
Boolean generic actions:
Construction of a logical chain of reasoning.
Statement and solution of the problem:
Formulation of the problem;
Independent creation of ways to solve problems of a creative and exploratory nature.
Visual demonstration material:
2 tables “Construction of a drawing of a room. Image of the room by one vanishing point;
Schemes for constructing the interior "Perspective construction of the interior in the frontal perspective";, room layout.
Reproductions of paintings by artists:
"Major's matchmaking", Fedotov P.A.,
"Arrived for the holidays", Reshetnikov F.P.,
"Morning", Yablonskaya T.N.,
"Mirror", Yury Pimenov
Materials: paper, pencil.
During the classes
Lesson steps:
Organizing time
Learning new material.
Fizkultminutka.
Creative practical work.
Lesson results. Reflection of activity.
1. Organizational moment
Emotional-psychological and motivational preparation of students for the assimilation of the studied material. Checking students' readiness for the lesson.
Lesson topic message.
2. Learning new material
The topic of our lesson is "Drawing the interior of a room."
Interview with students:
Today we will do our drawing with lines, depict the world with lines.
What kind of fine art is this? (Graphics)
And in order to correctly depict objects in space, what should be used in the drawing? (perspective)
What is perspective? (Perspective is a science that helps to correctly depict objects in space as we see them in nature.)
Who will name the rules of perspective?
Who will name the next rule?
(Rules, laws of perspective or patterns of perspective changes in objects, their forms:
As we move away from our eyes, the size of objects decreases.
Parallel horizontal lines, moving away, not only approach each other, but at eye level converge to one point - the vanishing point.
Everything that in nature has a vertical direction and in the figure looks vertical.)
What do you think the interior is? What does the word interior mean?
Say it in your own words.
The interior is an image of the interior of various buildings: classrooms, living rooms, corridors, etc.
The interior is the organization of the interior space.
Do you think it is possible to determine the purpose of a room, a room for interior design?
Let's look at reproductions of various paintings by artists on the blackboard.
What unites these 4 reproductions of artists? What is shown?
(The image of the premises, living rooms in the frontal perspective.)
In addition to the purpose of the premises, living rooms, what else can be determined by interior design? (Historical epoch, time of events.)
Interior styles.
Did the artists depict the location of the front wall in the same way?
(on 3 reproductions - a partial image, on one - in full.)
So, what are we going to draw today in the lesson? What is the problem we need to solve?
(Drawing the interior of a room in frontal perspective.
Problem - How to draw an interior in frontal perspective?)
What do you think the artist thinks before creating his work?
(About composition, about placing a picture on a sheet of paper.)
Considering the layout of the room.
The student draws a picture of the interior of the room with chalk on the blackboard.
Do you think the drawing is correct?
Where should you start drawing?
(from the location of the front wall on a sheet of paper)
What options for the location of the front wall in the figure can be?
(left, center, right)
When we used to draw in past lessons various items in frontal perspective - what line did we use and the point on this line to build the picture?
(horizon line and vanishing point)
Do we need this horizon line and vanishing point when drawing the interior of a room?
Mark the horizon line and vanishing point on a piece of paper or on a chalkboard.
Let's look at the schemes for constructing the interior "Perspective construction of the interior in the frontal position."
The type of interior perspective also depends on the change in the place of the vanishing point of the lines or the point of view. The side wall on which the painter is closer will always be in greater contraction than the opposite.
The painter must determine the vanishing point of parallel lines, which always lies on the horizon line and depends on the location of the painter.
If the left and right walls are equally distant from us, then the main vanishing point will be located in the middle of the front wall. If we move left or right, the vanishing point will move accordingly.
We need to outline in the drawing the side walls of the room, the floor, the ceiling.
Knowing that all parallel horizontal lines moving away from the viewer approach each other and, as they continue, converge at one vanishing point on the horizon line, one can outline the side walls. Those lines that are located above eye level (ceiling line) appear to be descending, those below eye level (floor line) appear to be rising.
Here we have outlined the location of the front wall, ceiling, side walls and floor. Next, to draw the interior of the room, what needs to be done?
(draw objects - furniture in space)
Who, if desired, will come to the blackboard and show the execution of the drawing of windows, the drawing of furniture in the frontal perspective?
Are there any mistakes in the drawing?
How should a drawing be done?
Using the method of linear-constructive drawing, the painter depicts all objects as if transparent and thus has the ability to accurately determine the position of each object in space.
A drawing of a table by a window or a drawing of a sofa by the wall begins with the image of the edge of the side wall of the object, located in the frontal perspective.
Then the lower horizontal plane of the object is outlined. The construction of the drawing begins, as it were, from the bottom up.
A linear-constructive drawing of each object in the interior of the room is carried out.
Guys, here we have completed a linear, contour drawing of the interior of the room in a frontal perspective, and then what do we need to do to complete the drawing?
(Run the volume of each item, and in general - the room.)
Volumetric tonal drawing.
Use different shading to convey the volume, shape of the depicted objects by means of chiaroscuro.
Physical education minute
Physical exercise:
We got up straight. Straightened back. Legs shoulder width apart. The arms are bent at the elbows. Hand movements to the side. Repeatedly.
We stand straight. Hands on the waist. 2 tilts to the left, 2 tilts to the right.
We stand straight. One hand is raised up, the other is lowered down. Alternately swing your arms up and down. Repeatedly.
We stand straight. Legs shoulder width apart. Hands down. Hands rise up - inhale, fall to the sides and down - exhale. 2 times.
Creative practical work
Task: Draw the interior of a room from a frontal perspective, or compose the interior of a room.
Guys, today we will be engaged in creativity in the lesson.
Creativity - this is the name of the work of artists in art.
Each student must compose the interior of the room in the frontal
perspective.
Which student will repeat the sequence of the task?
Task execution sequence:
Linear, contour drawing.
Each student remembers composition - placing a picture on a piece of paper.
Composition - structural construction artwork, the connection of all its components into a single whole (composition, composition, arrangement).
The student's choice of the location of the front wall (to the left, straight or right) on a piece of paper.
Mark the horizon line and the vanishing point on it.
Outline the location of the ceiling, side walls, floor.
Outline the position of each object in space using the method of linear-constructive drawing.
2. Volumetric - tonal pattern.
Use different shading to convey the volume, shape of the depicted objects by means of chiaroscuro.
Pencil shading in various tones from light to black.
Students begin to work independently, doing it with a pencil.
Guys, while working in order to detect errors in the drawing, compare your method of action and its result with the tables “Constructing a drawing of a room”, reproductions of paintings by artists and schemes for constructing an interior that are in the lesson.
Lesson results. Reflection of activity
Showcasing student work.
Collective analysis of drawings.
Interview with students:
What is the interior of the room, living room?
(The interior is an image of the interior of various buildings: classrooms, living rooms, corridors, etc.)
Have you managed to complete a drawing depicting the interior of the room in frontal perspective?
What caused the difficulty?
What did you like the most?
Homework:
Find an image of the interior of the room in an angular perspective in the paintings of artists. It is advisable to bring a reproduction of the painting to the art lesson. Give the name of the artist and the title of the painting.
Grade 9 No. Drawing lesson on the topic: "Construction of simple cuts"
Lesson topic . Construction of simple cuts.
Lesson Objectives .
1. To form practical skills in constructing a simple section.
2. Work out the algorithm for performing a simple cut.
Development task . Development of creative thinking and spatial imagination.
Benefit and equipment . Educational tables, individual task cards, T and M pencils, colored chalk.
Plan
Entering the topic of the lesson, posing the problem.
Gradual formation of students' skills and abilities in building a simple section.
Individual work of students on task cards.
Summing up the lesson and homework.
During the classes
1. Teacher . Today in the lesson we will repeat the studied material on the topic “Section”, then we will draw up an algorithm for solving problems for constructing a simple section and work out the skills of its implementation. (Checking readiness for the lesson ).
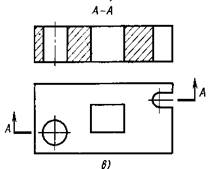
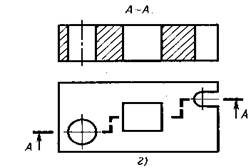
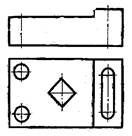
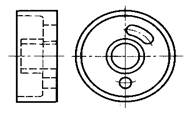
Teacher. Two drawings are given on the board (Fig. 1 and Fig. 2)


There is no outline of the object behind the cutting plane on the image. Try to complete the image with the missing lines to make a cut.
( I call two students to the board. They work with colored crayons )
Teacher. While the guys at the blackboard solve the problem, we will test your knowledge on this topic.
1.1. What is a cut?
1.2. Give it a definition.
1.3. What is the difference between a cut and a section?
1.4. Depending on the location of the secant plane in space, what are the cuts called?
1.5. Define frontal incision.
1.6. When is a cut called profile?
1.7. A cut with a cutting plane parallel to the horizontal plane is called ……….
( Checking the solution of problems for students working at the blackboard and evaluating their work )
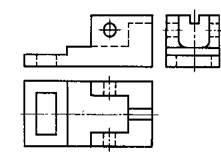
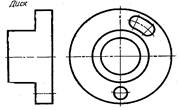
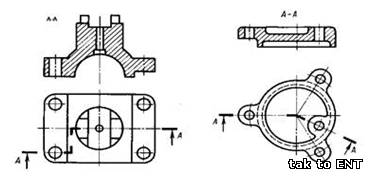
2 . Teacher . Let's move on to a new problem. A visual image and its drawing are given (Fig. 3 and Fig. 4)


In “fig.4” the incision has already been made. It is necessary to find a section figure and shade it.
Before starting the solution, let's analyze the geometric shape of the visual image (Fig. 3).
Answer. The part consists of a base, which is a rectangular parallelepiped. On both sides it has cutouts consisting of a combination of a parallelepiped and a half-cylinder. A rectangular parallelepiped adjoins the upper base, having a cutout in the form of a parallelepiped in the upper part. In the center, the part has a through cylindrical hole.
Teacher . Let's determine the symmetry of our part and the location of the cutting plane in the drawing (Fig. 4).
Answer . This part is symmetrical, and the cutting plane runs along the axis of symmetry.
Teacher . Mentally cut the detail. What to do next?
Answer. Mentally remove the part of the part that is closer to us.
Teacher . We removed the lower part of the part and ask the question: “What should be hatched in the main view?”, But it is better to ask the question - “What should not be hatched?”. It is easier to determine this on the drawing. (I will paint over these areas in the drawing yellow, and shade the section figure.)
In the top view “Fig.4”, we draw the cutting plane in red and look what is further behind the cutting plane. We will not hatch it! When performing work, we must control the projection connection. In our drawing, the surface of the side cutouts remained behind the cutting plane. Will we shade the projection of the cutouts on the main view of the drawing?
Answer . The surface of the cuts in the main view of the drawing will not be shaded, because she remained behind the cutting plane.
Teacher . Is the back wall of the cylindrical surface behind the cutting plane?
Answer. Yes, it is. We do not shade it.
Teacher. Behind the cutting plane there is also the rear wall of the cutout of the upper prism, and it is not shaded. Shading the cross-sectional figure at an angle of 45 degrees

Does everyone understand the solution to the problem of finding a section figure along a section?
Then take a task card (Fig. 9,) independently find the figure of the section in the section. Shade the cross section. Time to work 5 minutes.
 Fig.9(
Students complete the task
Fig.9(
Students complete the task
So, according to a given section, we made a cut and, using a given cut, we learned how to correctly select a section figure.
The next stage of our work is the compilation of an algorithm for performing a simple cut.
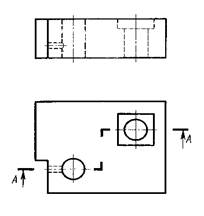
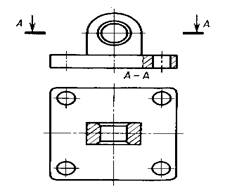
We will work with a visual image (fig.6), drawing (fig.7).
 Fig.6
Fig.6 Fig.7
Fig.7
Open your notebooks and write down the sequence of building a simple cut.
(The teacher works with the drawing, the students record the algorithm)
“ .
Answer. The part “Fig.6” consists of a rectangular parallelepiped and a cylinder, which stands in the center of the upper base of the parallelepiped. There are prismatic cutouts at the ends of the parallelepiped. Two through cylindrical holes are coaxially located in the center of the part along the axis of the cylinder. The detail is symmetrical.
Answer. These are two cylindrical holes and two prismatic cutouts.
Answer. The cutting plane will pass through the middle of the part, it will coincide with the axis of symmetry and in the drawing will be located in the top view.
Teacher . Will we apply the designation of the cutting plane? Why?
Answer .
Teacher. How will we do it?
Answer.
Teacher. This is the definition of what should not be hatched beyond the cutting plane.
Answer.
(At the end of writing the algorithm on the board, a drawing “Fig. 8” is obtained, the teacher answers the questions that have arisen on the algorithm)
 Fig.8
Fig.8
3. Teacher . We continue to work on individual task cards “Fig. 10……14” . We work following the algorithm for constructing a simple section.
 Fig.10
 Fig.11
 Fig.12
 Fig.13
 Fig.14
The more problems you solve, the higher the score.
( The teacher answers students' questions, names the next stage of the algorithm and helps those who find it difficult to complete the work.)
4. Teacher<> What did we do in class today?
Answer. Today we repeated the topic “Section” and worked on task cards.
Teacher . What new did you learn in the lesson?
Answer. We got acquainted with the algorithm for constructing a simple cut.
Teacher. Let's repeat the algorithm of the sequence of constructing a simple cut.
(Students respond.)
Teacher . What grades could be given to those who did well in the lesson? Sign your work and hand it in to the teacher.
(Grades will be announced in the next lesson)
Teacher . Open your diaries, write down the homework: Textbook p.
(Homework explanation ).
Teacher . What questions about the lesson and homework do you have?
Thank you for your work. The lesson is over.
Algorithm for constructing a simple section” .
2.1. Analysis of the geometric shape of the part, determination of its symmetry.
- The part consists of _____ Is the part symmetrical?
2.2. Finding the elements of the part, the shape of which is revealed using the cut.
- Are these holes or prismatic cutouts?
2.3. Determining the direction and location of the cutting plane, its designation.
- The cutting plane will pass through the middle of the part, will it coincide with the axis of symmetry and will it be located in the view in the drawing?
Will we apply the designation of the cutting plane? Why?
- We do not apply the designation on the drawing, because the part is symmetrical in shape.
2.4. Mental representation of section figures.
- How will we do it?
- We mentally remove the part of the part that is closer to us and imagine the figure of the section.
2.5. Removal of visible contour lines related to a mentally remote part of the part
2.6. Convert lines of an invisible contour to visible.
2.7. Hatching of section figures.
- We do not shade the projections of prismatic cutouts and the projections of half-cylinders.
2.8. Stroke the outline of the drawing.
Grade 9 No. Drawing lesson on the topic: Complex cuts
Goals:
Lesson type: lesson learning new material
Conducting methods: solving situations of a problematic nature, conversation, demonstration, frontal and individual oral and graphic exercises
Equipment, accessories: slides "Complex cuts", models of details, individual cards, posters
DURING THE CLASSES:
1. Organizational part
Greeting, checking absentees, checking tools, readiness for the lesson, communication of the lesson plan, the psychological attitude of students to conscious, close work
2. Solving a problematic problem
Demonstration of the part model.
Questions:
- How to identify the inner contour of the part? (using cut)
- what is a cut?
- what cuts are you already familiar with?
- how to draw a cutting plane in this part in order to reveal the entire internal contour?
Encourage students to selfthe conclusion that that in order to reveal the shape of this part, several cutting planes are needed, a new kind of section has turned out -difficult. Output.
3. Formation of graphic knowledge and skills
a) the message of the topic, the plan for studying the topic, the formulation of goals by students
b) students' formulation of the definition of "complex cut"
c) using slides and models, students independently classify complex sections, derive the rules for their representation and designation. Output.
4. Consolidation of the studied material
a) oral frontal survey:
- what cuts are called complex?
- in what cases complex incisions are used?
What is a stepped cut? broken?
- what is the peculiarity of building a broken section?
- what is the difference between the designation of complex cuts from simple ones?
Output.
b) frontal oral solution of graphic problems
№ 1. The figure (slide) shows simple and complex sections. Define the names of the cuts.
BUT

B

IN

G

D

E

№ 2. Determine in which examples it is advisable to use a stepped cut?
BUT

B
IN

№
BUT

B

IN

№
BUT

B

IN
G
№ 5. In the figure, only in one case, the section is indicated correctly. In which drawing is the broken section correctly depicted and indicated. Correct the errors in the rest of the drawings.
BUT
B
c) frontal solution of graphic problems at the blackboard (several students)
Task: perform and designate a stepped and broken cut


d) individual graphic exercises
Task: perform and designate stepped and broken cuts
Option 1.

Option 2.

e) checking and evaluating graphic exercises
5. Homework:
write a test closed type on complex sections (number of questions 3-5),
prepare A4 format for graphic work
6. Final part
Compose a quatrain that reveals what happened in the lesson: a noun, two adjectives, three verbs, a figurative comparison, my attitude to what I studied.
Worksheet "Complex cuts"
№ 1. The figure shows simple and complex sections. Define the names of the cuts.
BUT

B

IN

G
D

E
№ 2 . Determine in which examples it is advisable to use a stepped cut?
BUT

B

IN

№ 3. Determine in which examples it is advisable to use a broken cut?
BUT
B

IN

№ 4. In the figure, only in one case, the section is indicated correctly. In which drawing is the stepped section correctly depicted and labeled. Correct the errors in the rest of the drawings.
BUT

B

IN
G
№ 5. In the figure, only in one case, the section is indicated correctly. In which drawing is the broken section correctly depicted and indicated. Correct the errors in the rest of the drawings.
BUT
B
GRAPHIC EXERCISES
Full name
1 option


GRAPHIC EXERCISES
Full name
Option 2
Task 1: make and mark a stepped cut

Task 2: make and mark a broken cut

Test on the topic "Sections"
Option 1
1. What is the name of the image of a figure obtained by mentally dissecting an object with a plane?
A) section; B) view; B) analysis.
2. How is a section figure distinguished in a drawing?
A) blackening B) dash-dotted line; B) hatching at an angle of 45o
3. What type of lines encircle the rendered section?
A) a solid thin line;
B) dashed line.
4. According to the location of the section are divided:
A) on corners and extended
B) on corner and superimposed
C) on the rendered and imposed
5. Remote sections have ...
A) in the contour of the image of the part.
B) directly on the views,
C) outside the contour of the image of the part.
Test on the topic "Sections"
Option 2
1. What are sections used for?
A) for the image of a limited place on the surface of an object;
B) to identify the transverse shape of the object;
C) to enlarge or reduce the image.
2. What section is called remote?
A) located directly on the views;
B) located outside the contour of the image of the part;
B) located on the technical drawing.
3. What type of lines outline the superimposed section?
A) a solid thin line;
B) a solid main thick line;
B) dashed line.
4. What is the name of the image of an object mentally dissected by a plane?
A) analysis B) view; B) section.
5. Sections - a way to identify ...
A) the transverse shape of the object.
B) the longitudinal shape of the object.
C) the material from which the part is made.
Topic "Sections and Cuts"
Option 3
1. What are the sections?
A) rendered and imposed;
B) internal and external;
B) lower and upper.
2. What section is called superimposed?
A) located directly on the views
B) located outside the contour of the image of the part
C) located on the free field of the drawing
3. How is the cutting plane designated for extended sections?
A) an open line with arrows and letters;
B) wavy line and letters;
B) is not marked.
4. How is a sectional figure highlighted?
A) hatching;
B) does not stand out;
B) blackening.
5. What is called a section?
A) projection of a figure obtained by dissecting an object with a plane,
B) an image of a figure obtained by dissecting an object with a plane,
C) displaying the figure obtained by cutting the object with a plane.
.
Drawing Class 9 "B" Topic: Complex cuts: Stepped and broken cut
Target: to form students' knowledge about education, types, images and designation of complex sections; to promote the formation of skills to read and perform drawings with complex sections; develop spatial representations and imagination; cultivate a graphic culture.
Lesson type: consolidation
Method : solving situations of a problematic nature, conversation, demonstration, frontal and individual oral and graphic exercisesEquipment : drawing accessories
During the classes:
1. Organizing time . Mutual greetings between teacher and students. Determination of absentees, checking the preparedness of students for the lesson, organizing the attention of students
2. Checking homework : Revealing the level of knowledge by students of the material given at home; identification of typical shortcomings in knowledge and the reasons for their occurrence; elimination of identified deficiencies.
3. Comprehensive knowledge test : To stimulate the respondents and the whole class to master the rational methods of skill and self-education
4. Goal setting: Preparing students for active and conscious assimilation of knowledge. Message topics, goals and objectives of the studied material. Setting the goal of the lesson for the students.
5. consolidation
a) oral frontal survey:
What cuts are called complex?
In what cases are complex incisions used?
What is a stepped cut? broken?
What is the peculiarity of building a broken section?
What is the difference between the designation of complex cuts and simple cuts?
6. Homework Information


