Where is the universal key for the golden cat? Baths "Golden Cat"Dishonored Walkthrough. The Golden Cat brothel
The Master Key (master key) is a story item in Dishonored 2. Using it, you can open the main part of the Stilton mansion during the passage of “Mission 7 – Crack in the Universe”. You will not be able to complete this task without finding the key, and it is hidden very well. Moreover, this item is very small, and therefore you can simply miss it, then walk around the house for hours, looking for the right thing. In this guide, we will show you exactly where the master key is located.
Heading into a small alley, there is a large red building on the left, a small blue building on the right, and a destroyed blood building above the red building. Two guards chat around the corner, and another meets with a civilian on the roof of a red building. Tail is alone on the roof when she leaves to knock her out and wait until the two below are facing in opposite directions to get rid of them. Looking down from the red building, you can look into the entrance to the Great Conservatory, which is heavily guarded - with a large watchtower at the front and several guards patrolling all directions.
If you're having trouble with names, this is the same mission where you find yourself in an old, run-down mansion where you can travel through time. It is full of all sorts of secrets, as well as places that can only be reached if you are in the right time. Some items will be available in the past, but will not be available in the present. This is a very original approach to game design, however, it makes it much more difficult to find the right key, which is not even marked on the map.
Approach the counter to find a bone charm sitting on a table with coins and pistols behind back door. Look up the narrow blue building behind the red pub to find a balcony high up, and flip off the roof to enter an abandoned apartment. Watch the ride as you enter: there are several howl traps and triplets crossing the place.
Change Find a sales assistant
Climb up the broken ceiling to the second floor to reach the shrine and claim #2 and #3. From the roof of the red bar building, jump to the balcony of the condemned building and prepare to deal with more bloodsuckers. As you enter the building, there are nests on all sides - and, more importantly, a Nest Guardian to the left. You must trunk him from afar, as bloodsuckers will ignite around him when he falls.
Master Key Location in Dishonored 2
We got stuck on this level when we were looking for a combination for the research room. The sequence itself is quite easy to find, but it is located behind a door that can only be opened using the master key, so until you find it you will not be able to advance further in the mission.
Directly to the left, hanging over the table, is a 200g Ashworth painting that you can steal. If you'd rather not pay for it, make sure you've completed your quest before collecting it for recording. The safe contains several ingots, a pistol and ammunition. If not, grab the flammable bottle on the table by the safe and get to work clearing the center.
Coming out onto the other balcony, you can now see the building the assistant is supposed to be locked in - only the only entrance is through the bottom floor on the left side. This means you have few options on how you can proceed. The crossing from here can be a little dangerous, but you can also go back to the top of the red building and try a different route. Before you do this, look to the other balcony towards the Main Entrance of the Conservatory and go from the lamppost to the watchtower and turn off the whale tank in the back.

First of all, make sure that you are in the past, since the key will not be found in the future. After entering the mansion, walk past the piles of bags and suitcases and then turn left. Walk forward along the corridor until you come to a dining room with two large statues. The key can be found on the stool next to the dining table.
From the red building, look to the other side of the Wall of Light from the earlier section to another balcony and go through the small house to the balcony on the other side, looking down at the left side of the Conservatory entrance. There are two guards who patrol this side, wait for someone to leave before taking the guard who lingers, and then the second one when he returns, and enter the small garden path under the main stairs.
The door on the left here is blocked, ignores it and continues under the bridge where the whale's oil tank is controlled by the Wall of Light. On the other hand, the two guards in front will talk about how the fountain is missing a grate before splitting. Wait for the guard to land on the notice board in the garden and knock him out when he leaves.
Dishonored. Walkthrough
|

- general information .
03. House Of Pleasure
"Dog Pit"
Dishonored Walkthrough. Pub "Hound Pits"We go around all the rooms, looking for useful items using the magic “Dark Vision Level II”. We approach the admiral at backyard, let's go to bed. In the morning we go down into the sewer and use sleeping darts to immobilize two weepers - people infected with rat plague. We find the rune in the box and the rune in the water. We get back through the coast: open the grate with the valve, swim out into open water, and climb back to the ground. We approach Pierrot, buy upgrades and a rune from him.
Coming out of the garden, there is one guard who will patrol from the security system to the door to the assistant building and the one who will patrol the road. Separate or distract them to take them out, then enter the building. Inside the first floor there are two civilians squatting - who won't mind your presence. Pay attention to the crossbow bolts: you begin to climb the stairs and jump onto the railing until the next landing - as the body with the bolt embedded in it tells the tale.
Edit Entrance to the Conservatory
When you enter the apartment, her assistant appears to have left, but he has left behind his plan and skeleton on his main desk, as well as a map of the conservatory with several pinned points - and a note. Don't forget to check the rest of your chair space, mana word, and ammo on his desk. Now you have several different ways enter the Conservatory.
We approach the admiral and receive a task - to kill the Pendleton twins. These are the older brothers of our ally Lord Pendleton, but they support the power of the High Chancellor in Parliament, and therefore must be eliminated. The twins took refuge in a brothel " golden cat", little Emily is being kept there.
We are sailing away on a mission together with the boatman Samuel.
If you disabled the Wall of Light under the stairs, you will still have to sneak around the guards - this is made easier with the guard tower disabled. Also in the gardens under the stairs you can have fish to swim through the bars into the conservatory entrance - but make sure you don't alert anything when you do. If you listen to the guards at the edge of the lower garden, you will realize that the grate behind the fountain has disappeared, meaning you can crawl through there and climb up the other side of the fence. Perhaps the easiest way - thanks to the shopkeeper's assistant - there is a path from his balcony that leads through the walls and entrance to the Conservatory, even allowing you to jump to the second floor window. There are many ways to log in and more more ways cross the winter garden.
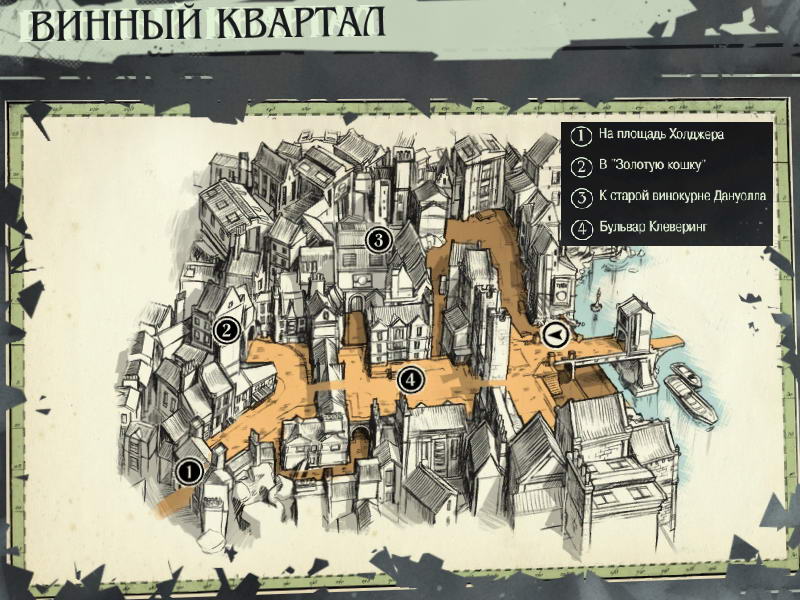
Wine Quarter
We moor again to the shore of the Wine Quarter. We walk to the end of the coast, enter the city along the stairs on the left, turn right, go forward to a dead end. We come to where Staraya Vetosha’s house was in the previous level. On the roof of the third floor above Vetosha's house lies a corpse and several useful items. We pass further along the street into the alley on the left. There are bandits here, but they are not touching us now. We can freely go through the door leading to the distillery.
For the purposes of this guide, we will follow the shopkeeper's assistant's plan and enter the basement by working our way up the floor. You can find the delivery entrance next to the road from the open grate behind the fountain - on the right side of the Conservatory. Once she is incapacitated, all the witches in the Conservatory will fall unconscious and you will be free to wander around and steal as much as you want.
Enter the Conservatory from the adjacent shop balcony. The open window as you move along the ledges is obviously due to the bloodsuckers visible around it. There are two witches chatting in front of you on the other side of the wall. Across the space is Ashworth's car. Walk along the left side to the bookshelves, and from there to the chandelier. Stay in this corner. 2 witches are sitting on the chandelier on the other side. The ledge above you is next to Ashworth's office. Climb onto the ledge above it, go through open window and to her laboratory and take the lenses.
Old distillery
Dishonored Walkthrough. Dunwall Whiskey BreweryHere the bandits don't bother us either. Along the way we collect all useful items. We go into the distillery building. On the right in the locked room you can find drawing "Incandescent Paste", you can get there by teleporting into the opening above. Below, three mourners are locked in a cage. We put them to sleep with darts from afar, enter the cage, and take away valuables.
Don't leave to look around, you can do that later. you will take longer than her conversation, the dog will find you. Go back through the window and go back to the top of the bookshelf next to the machine. Keep an eye on the guards and go to the car for a moment. lens, pull the switch and your seat will take your place. This magical dog is like a cooler version of a wolfhound and has good senses to detect you. While a single crossbow bolt can take it out, be warned: Coffin Wave will be resurrected in about six seconds unless you destroy its skull.
We go into the room with a moonshine still, we listen to the leader of the bandits - Slackjaw. He can help with the murder of the Pendleton twins, and can also open a safe path to the Golden Cat brothel, but for this you need to complete a couple of his tasks. The first task is to infiltrate Professor Galvani's house and find the missing man Slackjov.
The good news is like other animals - killing them won't count against your chaos or mercy - plus, they won't leave the body behind. When the dog is gone, check the table to find the remains of the Shopkeeper's Assistant and a note about the break-in plan, noting the part about disabling the alarm. Also check the back of the basement for a display containing three raw whales.
To enter, you can crawl through the nearby window to the main floor entrance, then return to the room and unlock it from the inside and break the display using bone marrow. Don't forget to pick up the Archive Key while in the room. After walking past the main table in the basement, you will enter a hallway with a lot of trash, and by turning right, you can spy two witches near the Beatitude's nest as they feast and lay eggs in the wolfhound on the table. If you want to bypass them completely, go back to the previous room and look for an open grate along the top wall that leads to a series of pipes that you can take along the wall to the elevator.
We leave the distillery building. Now the lattice door on the right is already open, we enter it and take bone amulet (1/5) . But because of these open doors There are aggressive mourners walking around the distillery yard. We climb onto the pipes from above and follow them out of this area.
Wine Quarter
Dishonored Walkthrough. Bottle StreetWe returned to Bottle Street. We go further into the alley on the right. Be careful! Three assassins are ambushing them ahead! Two of them stand on the balconies to the left and right, the third sits on the roof to the right. All of them can be put to sleep with shots from afar. We collect all the useful things on the balconies, on the upper balcony on the right we take bone amulet (2/5). We go down to the merchant Griff, collect his things, buy sleeping darts. We climb onto the roofs, approach Galvani’s house, put the guard on the balcony to sleep, and enter the house through the balcony door.
Clearing the area sooner will make things more difficult - but not impossible. Wait until they are separated and carefully approach the table to take out the first Witch and the other one on the elevator. The bleeders may flare up, but if you're slow and calm, they won't attack when you choke or throw the first witch, and again when the second starts looking for her comrade.
With the witches off the road, you can take out the nests or go around them by moving to the left. Be sure to check the area for a few bottles of flammable rum to help the job. You can now make your way to the elevator and stairs, or even return to the previous room's stairs.
Dr. Galvani's office
Dishonored Walkthrough. Galvani's officesThere are only a few guards inside. We go up to the third floor, take evidence next to the body of the murdered bandit. On the bookshelf next to the globe, move the book and open the door to Dr. Galvani’s secret room. In it we take the rune (1/5). We leave the house through the balcony.
Otherwise, you can also look to the right of the room for an open trellis alcove. Inside, break the display case to get a rune. To get to the painting behind it, find a bookshelf that you can flip into a small niche holding a 200g worth painting and other supplies. Taking the stairs from the main part of the service entrance will take you outside the lobby. It's best not to take the door to the lawn, as four witches are arching outside - one speaks to the others from the top giant statue turtles.
Since there aren't many there, it's best to leave them alone, especially since luring can in turn lure them all. Instead, go through the lobby to the main desk and steal from the cash registers. Carefully proceed to the main hall from the lobby and take the large room. It is several stories high and crawling with witches, many of whom patrol the upper halls or sit hanging from railings or bookshelves. For this reason, it's best not to try to cross from here - you need the height advantage.
We return to the old distillery and talk to Slackjov. We get key to the Captain's Bridge hotel. We take on the second task - to find out the code to the art dealer's castle in exchange for Slackjov's help in eliminating the Pendleton twins. We leave the distillery area.
We pass to Clevering Boulevard (central square), from there we go down to another street. One of the doors below will be open, there will be an old woman standing inside Old Rags, and next to her bone amulet (3/5). There is also an underground entrance to the Golden Cat bar, but you can’t get through here without a key. We go out onto the street, go up it, and turn into the alley on the right.
If you want some easy money, quickly leave where the body is hanging from the statue and grab the coins scattered around, then return to the hall and jump to the second floor. In the next room, stand behind the screen as two witches are talking to each other, one on a high bed and the other around the corner. Wait until the one on the floor comes down the hall and slips into the room across from you and catches her in an unfamiliar place on the other side of the hall, and then returns to sleep, abandoning the one lying on the bed.
There's a trick to skip the nests and go straight to the bone bowl. Return to the room with the body and ask for the darts. Other rooms in the back serve as temporary sleeping quarters and contain several interesting items, such as the Silver Egg in the back. The stairs next to the rune leading to big nest Blessed Blessed and the covered office upstairs, so instead exit at the end of the hall to return to the main hall of the Conservatory. Take a right and slide down to the door with the constables.
We see how two guards take the elixir from the woman. If you don't help quickly, the guards will kill the woman. To save the girl, silently stun both of them using the magic “Invasion Level II” or “Slowdown Level II”. The girl gives for help key to the art dealer's house.
We go out to the next square, teleport to the other side of the street, go to the Captain's Bridge hotel. On the ground floor of the hotel we find bone amulet (4/5). We climb up the stairs to the roof of the building.
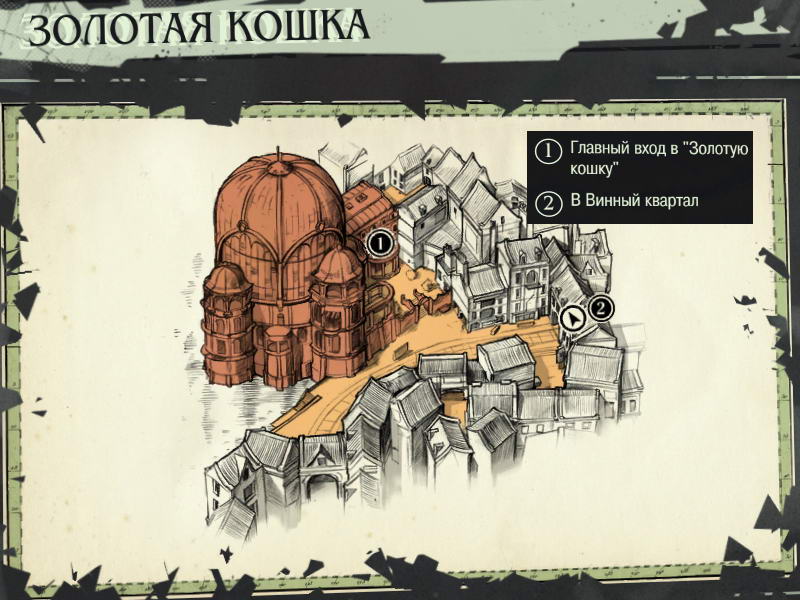
Baths "Golden Cat"
Dishonored Walkthrough. The Golden Cat brothelWe find ourselves on the roof of the building. We approach the edge, turn on the Heart, look at the secret objects. We go to the nearest rune in the neighboring house on the right. We teleport to the balcony of the house on the second floor. We go inside the building, climb to a higher floor, take the rune (2/5). We get out of the building through the window and pass through the pipes closer to the entrance to the brothel.
Above the entrance we see a guard standing on the balcony. We imperceptibly teleport to him and choke him from behind. We look through the doors to see what's happening inside. We are waiting for the guard to talk to the owner of the establishment, Madame Prudentia. When the owner leaves, we put the guard to sleep and drag him out onto the balcony. We go after the owner, put her to sleep, take her away universal key golden cat.
We go into the room opposite the hostess’s room, take the rune (3/5) on the wall. We pass into the central round hall. Everyone here is busy with their own business, you can easily pass by. We enter the door leading to the silver room. Here, an art dealer is chained to a chair. We press the lever to hit the dealer with electric discharges until he says the password 696. You can go back to the hostess's room.
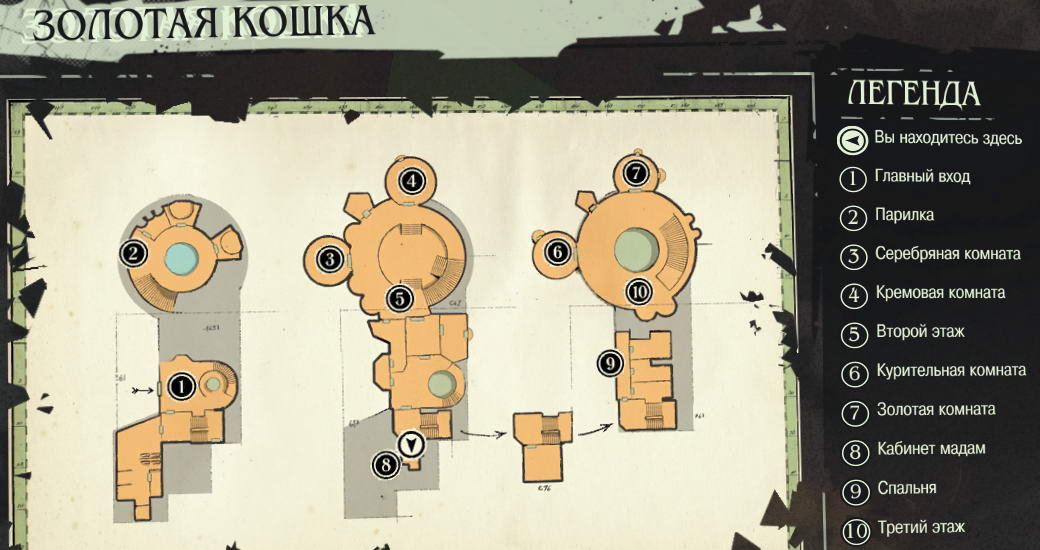
From the central round hall you can go up the circular staircase, where one of the Pendletons locked himself in a separate room with a girl. You can go downstairs to the basement. There, the second of the Pendletons is in the sauna with a girl. (This brother can be killed if the hot air valve in the next room is fully opened. But we will do without killing at all). We return to the hostess's room.
We go down the angular wooden stairs, eavesdrop on a conversation between two girls, and learn about the secret exit from the location. We go up the stairs to the penultimate floor, go into an empty room, collect things, take bone amulet (5/5). We climb up the stairs to the top floor. In the first room we put the courtesan to sleep and take the rune (4/5). In the third room we take useful things, in the second room we find the girl Emily. We take her down the stairs to the exit from the location.
The girl will get to the boatman on her own, and we go to the Old Distillery to see Slekjov. He receives the code to the safe from us, and in return promises to throw the Pendleton brothers into their own silver mine. The task is completed.


